Creating a private test net
This guide will walk you through the process of setting up your own private network using Symbol’s technology.
To run the network, we are going to use the package Catapult Service Bootstrap. This software suite contains the necessary setup scripts to help developers to quickly build their own network.
Note
This bootstrap setup is for learning and development purposes and it should not power any production Symbol instances.
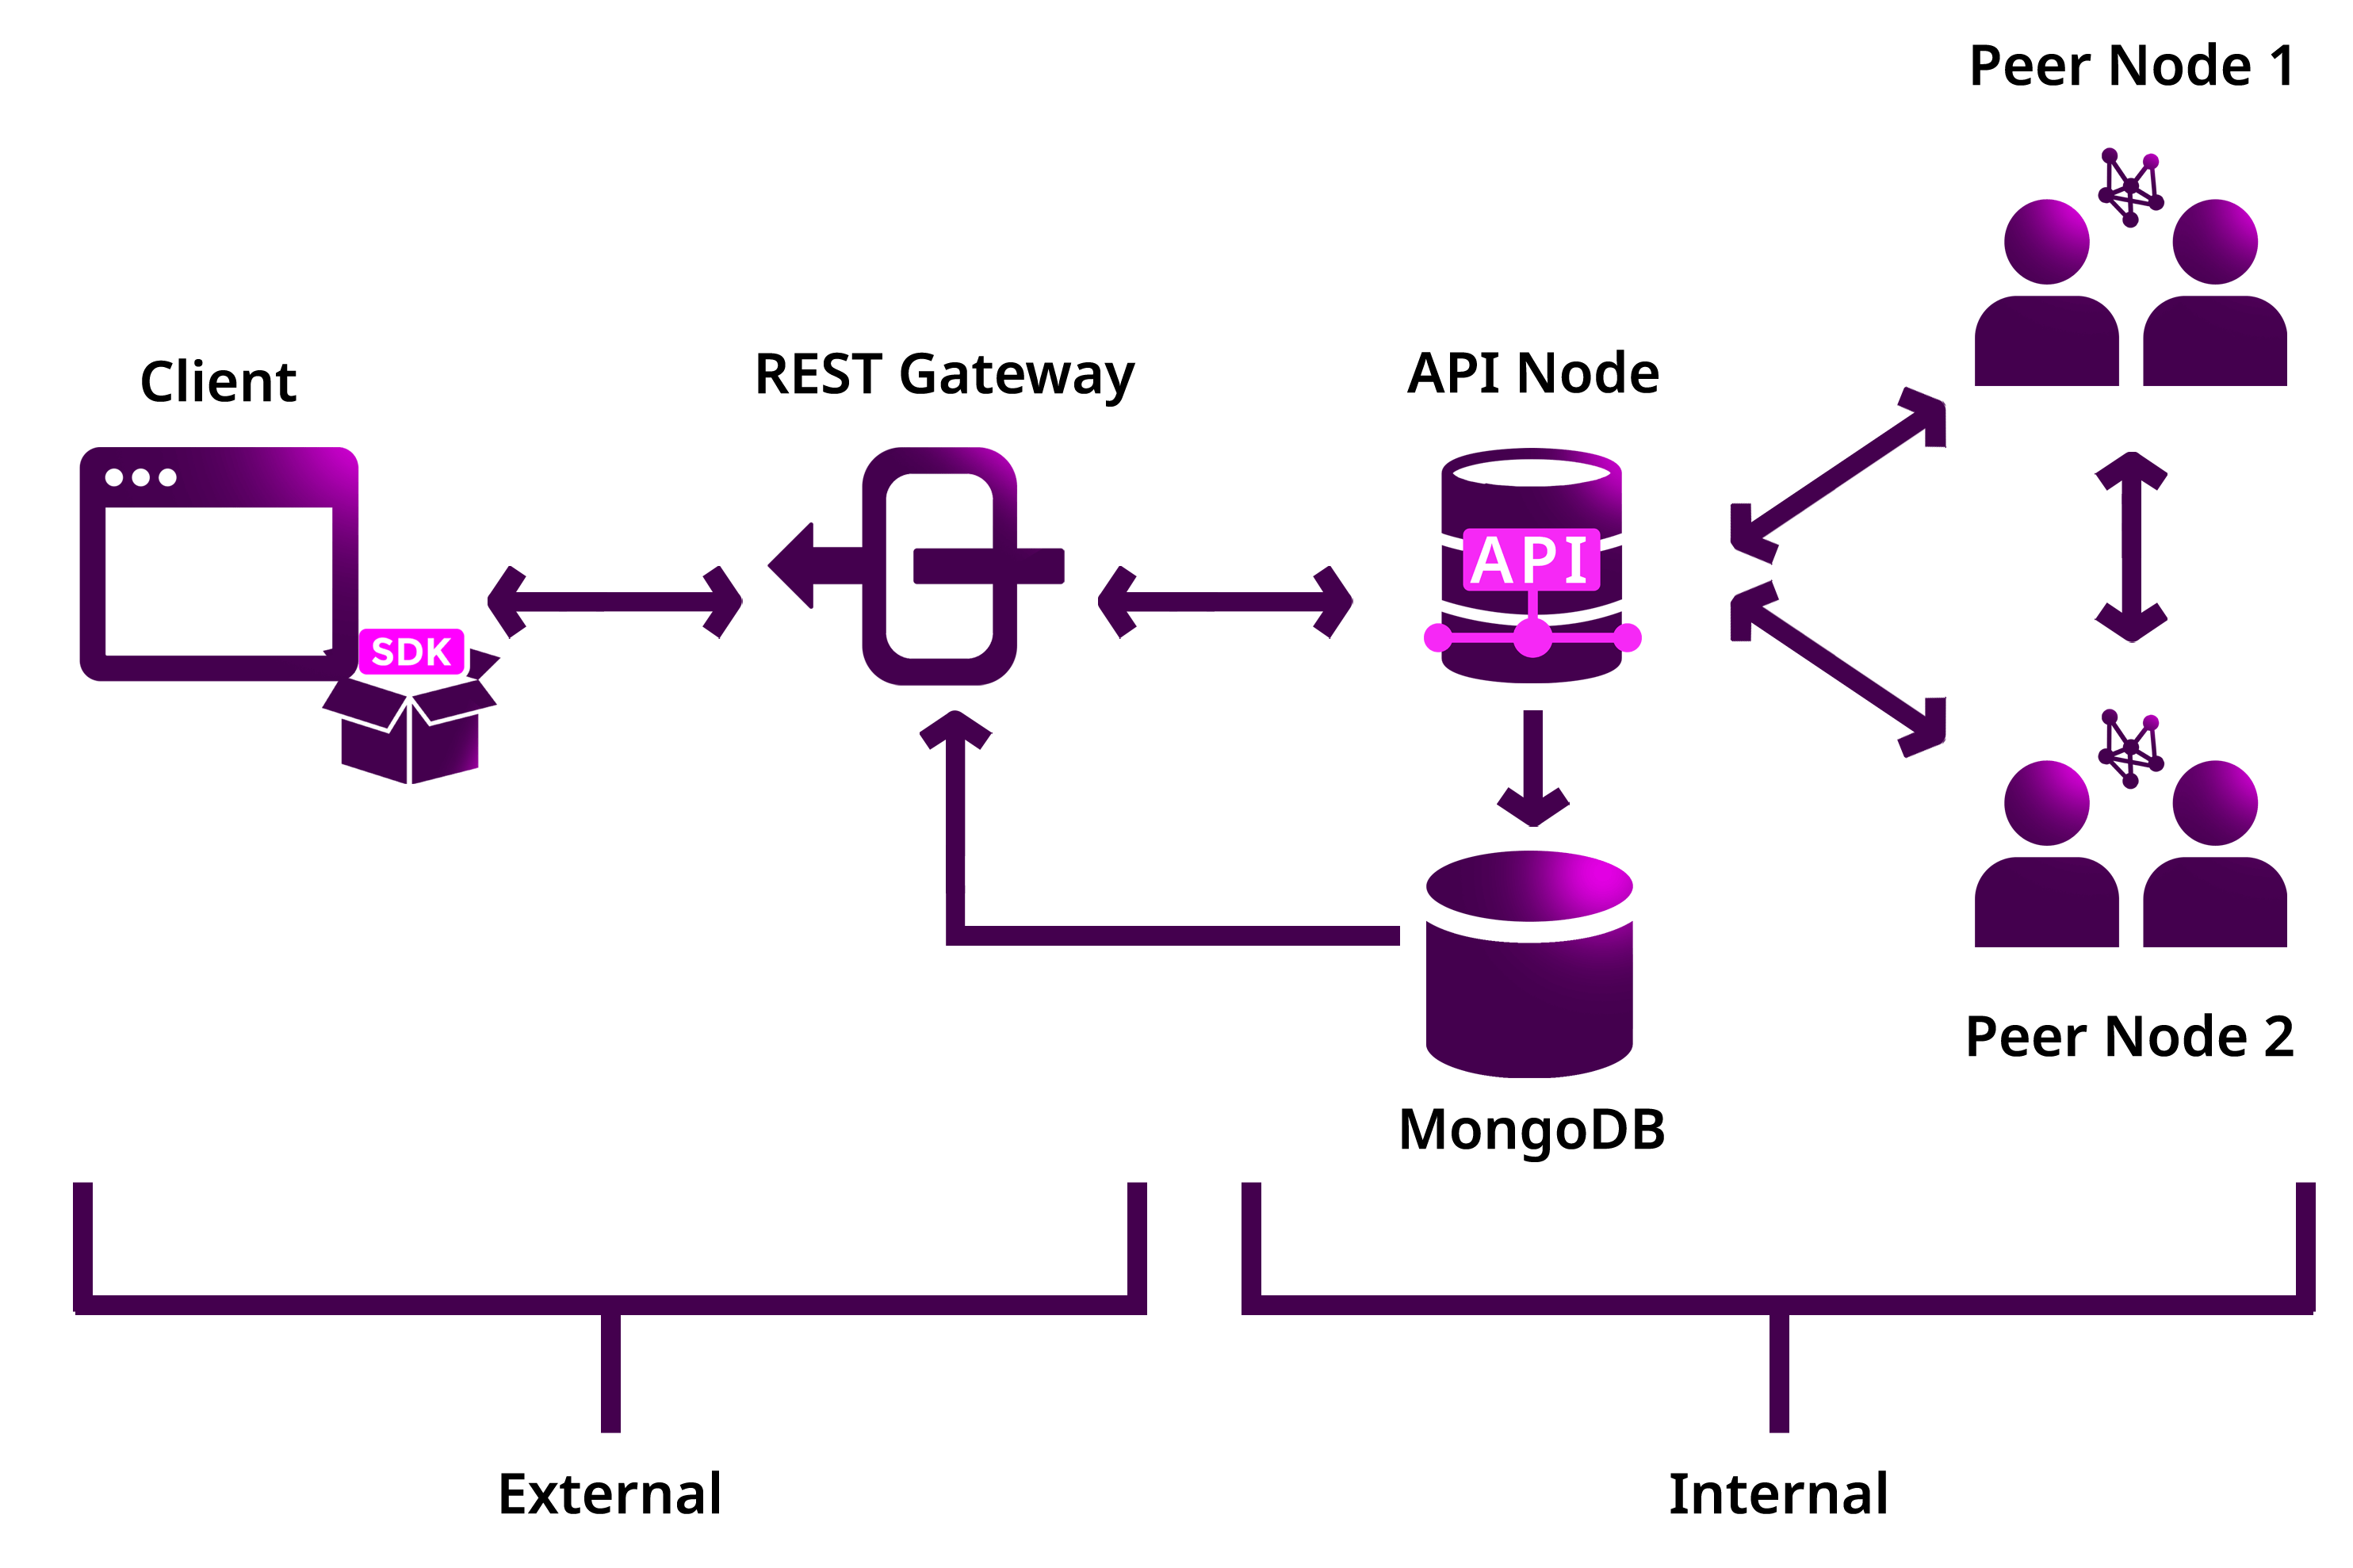
Symbol Service Bootstrap deploys a private network with the following high-level architecture:
- peer-node (1 and 2): Peer nodes verify transactions once the API pushes them into the P2P network. They run the consensus algorithm, create new blocks, and propagate the changes through the network.
- api-node: The API node stores data in the MongoDB database once transactions are validated. They also identify and store partial aggregate bonded transactions.
- rest-gateway: Combines HTTP and WebSockets to perform read and write actions on the blockchain.
Hardware requirements
Symbol Service Bootstrap has been tested on computers with the following minimum requirements.
- CPU: 2 cores or more
- Memory: 4GB or more
- HD: 20GB or more
Note
Although you might be able to run the software in less powerful instances, you might encounter some issues while installing or running the node.
Environment requirements
The setup scripts are available for Linux and Mac OS and automated using docker.
To run a test net node, you will need to have installed the following docker tools:
Port requirements
Make sure that the server’s host is accessible from the internet and that the following ports are open and available:
- The port
7900 is used by catapult-server to communicate between nodes.
- The port
3000 is used by the REST Gateway to expose the endpoints to interact with the node.
Installation
- Use this link to download the latest release of the package, or clone the repository directly using Git.
git clone https://github.com/tech-bureau/catapult-service-bootstrap.git
- Open the
catapult-service-bootstrap folder.
cd catapult-service-bootstrap
- (Optional) Customize the network’s configurable parameters before launching it.
- Run the network.
Note
To run the docker containers in the background of your terminal, you can run the service in detached mode using the option --detach or -d.
- Verify that the node is running by opening a new browser tab with the following URL:
localhost:3000/chain/height.
To stop the process, press Ctrl+C.
Find more commands to manage the network in the installation notes.
Getting test currency
An account is a deposit box where you can hold mosaics (tokens) and interact with them announcing transactions.
To announce a transaction, the sender should pay a fee to provide an incentive to those who validate and secure the network and run the infrastructure.
This cost is paid in cat.currency mosaics, the default network token.
After running the catapult-service-bootstrap tool for the first time, the available currency supply is distributed between a generated set of accounts.
To keep one of these accounts quickly retrievable, we are going to store one of them using a command-line tool to conveniently perform the most commonly used actions i.e. interact with the blockchain, setting up an account, sending funds, etc.
- Install Symbol CLI.
npm install --global symbol-cli
2. Open a new terminal window.
Then, go to the directory where the bootstrap tool has generated the addresses.
cd build/generated-addresses/
- Display the content of the
addresses.yaml file.
4. Under the section nemesis_addresses, you will find the key pairs which contain cat.currency.
Copy the private key of the first account.
- Type the command
symbol-cli profile import using the key obtained in the previous step.
symbol-cli profile import

Enter network type (MIJIN_TEST, MIJIN, MAIN_NET, TEST_NET): TEST_NET
Enter your private key: 123***456
Enter a Symbol Node URL. (Example: http://localhost:3000): http://localhost:3000
Insert profile name: base-profile
You should see the account credentials in your terminal.
Profile stored correctly
┌─────────────┬──────────────────────────────────────────────────────────────────┐
│ Property    │ Value                                                            │
├─────────────┼──────────────────────────────────────────────────────────────────┤
│ Address     │ SCVG35-ZSPMYP-L2POZQ-JGSVEG-RYOJ3V-BNIU3U-N2E6                   │
├─────────────┼──────────────────────────────────────────────────────────────────┤
│ Public Key  │ 654...321                                                        │
├─────────────┼──────────────────────────────────────────────────────────────────┤
│ Private Key │ 123...456                                                        │
└─────────────┴──────────────────────────────────────────────────────────────────┘
As the name suggests, the private key has to be kept secret at all times.
Anyone with access to the private key ultimately has control over the account.
On the other hand, you can share securely the public and address of your account with other participants of the network to receive transactions from them.
Next steps
Now that you have your test network running and an account with some cat.currency, we recommend you to surf the Symbol Developer Documentation.
In this portal, you can find detailed information about Symbol’s features and self-paced guides on how to use the software development kits.